What are Automations?
Automations are multi-step email flows that are automatically triggered by specific contact actions, behaviors, or timeframes. Automations are most commonly used for onboarding new customers, driving product adoption, nurturing leads, retaining customers, upselling customers, and winning back those who have become inactive.Common Automation Examples
- Welcome
- Onboarding
- Retention
- Upsell
- Win-Back
Introduce your brand and set expectationsSample prompts:
Create a 3-email welcome flow for new leads: first email introduces our brand and value, second shares a customer success story, third sets expectations for future communications. Build a triggered welcome flow for new newsletter subscribers: send a welcome, then a follow-up with top resources, then a check-in asking for their main goal. Create a 3-email welcome flow for new subscribers that introduces our product features and includes helpful getting started tips.
Creating an Automation
To create an automation, go to the Create page, select Automations from the tabs above the prompt box, and describe your goal. Brew’s AI handles the heavy lifting - instantly building a flow where both the logic and every email are tailored to your audience, written in your brand voice, designed to match your design system, and informed by your knowledge. Review the flow and each email, make any tweaks you want, and launch high-converting automations in minutes.Describe your automation
Tell Brew what you need:
Create a 3-email welcome flow for new subscribers that introduces our product features and includes helpful getting started tips.The more specific you are about purpose, length, and content, the better your flow will be.
Automations are triggered via API, giving you complete control over when they run and what data is passed. Use the
/api/v1/automations/{automationId}/trigger endpoint to start automations from your backend when events occur in your system.Review the generated flow
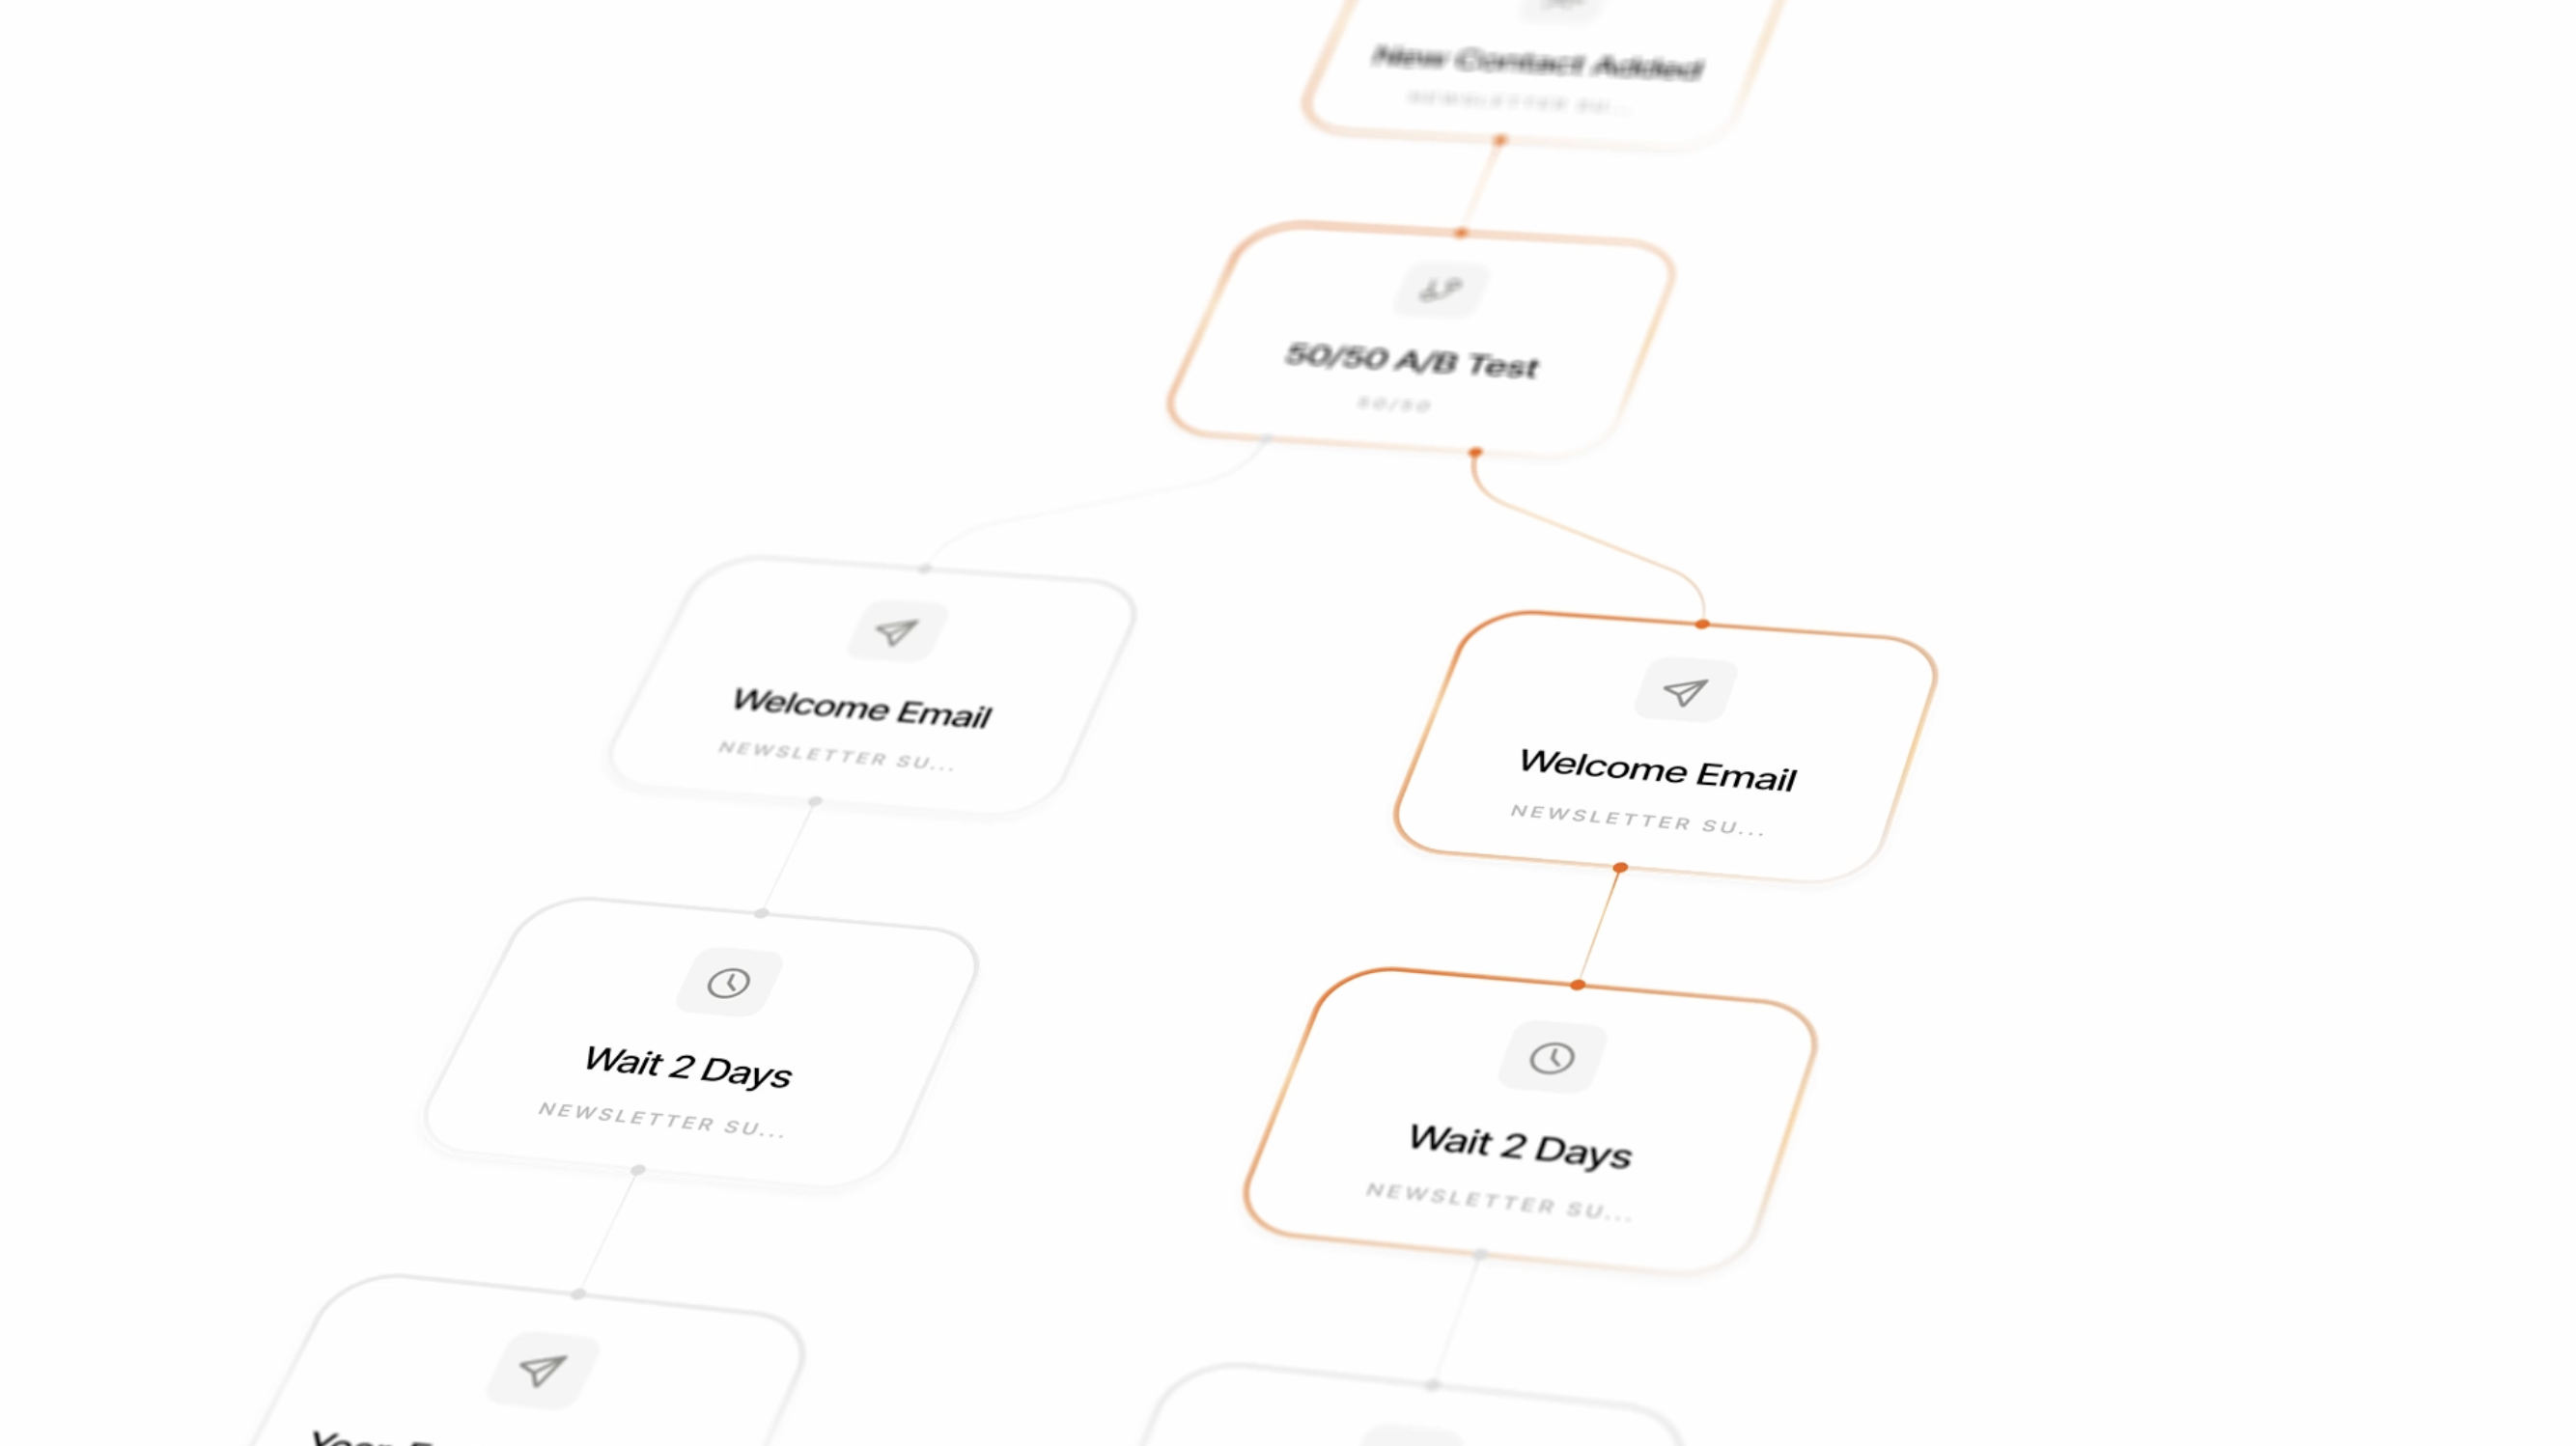
Brew does the heavy-lifting, creating the entire automation flow - including triggers, timing, branching, and email content. Now you can review and edit it. To do this, you’ll want to understand the main building blocks of an automation: Triggers & Nodes.What are Triggers & Nodes?
- Triggers are what start your automation flow. They answer the question: “When should this flow begin, and for whom?” For example, a trigger could be when a new contact is added, when a contact is updated, or when a specific event happens.
- Nodes are the steps that happen after the trigger. Each node tells Brew what to do next - like sending an email, waiting a certain amount of time, filtering your audience, or splitting the flow into different paths (branching).
Customize if needed
Editing actions:
- Add, remove, or rearrange nodes (emails, timers, filters, branches)
- Edit email content, subject lines, and design
- Adjust timing between messages
- Add or remove branches for personalized journeys
- Copy emails from other flows to reuse content
- Use audience filters to target or exclude specific contacts
- Save your changes before activating
- Preview any email in your flow (send a test to yourself or a teammate)
- Personalize your emails with dynamic content: use contact properties (like names or custom fields) and event properties (data from triggering events) to tailor messages for each recipient. Brew’s AI automatically adds relevant merge tags based on your brand and audience data. Always provide fallback values for merge tags to ensure emails are sent even if some recipient data is missing.
Brew automatically applies your brand voice and design system to every automation. You can further customize flows for specific customer journeys - such as onboarding, payment issues, or win-back - by editing content, timing, and branching as needed.
Activate your flow
Once you’re satisfied with your flow, activate it to start sending automatically when trigger conditions are met.
Each automation trigger consumes credits from your plan. Email sends within the automation count toward your monthly email limit.
| State | Color/Icon | Description |
|---|---|---|
| Draft | gray | Flow is being created or edited and is not yet live. You can add, remove, or edit nodes in Draft mode. You must save before activating. |
| Active | green with pulsating dot | Flow is live and processing contacts. Only flows with at least one Send email node can be set to Active. To make changes, pause or archive the flow first. |
| Paused | orange with pause icon | Flow is temporarily suspended. While paused, new triggers are not processed. When you resume, only new triggers going forward will be processed. Pausing is useful for short-term changes or quick edits. |
| Archived | red with stop icon | Flow is fully halted. No new triggers will be processed. Use archiving when you want to completely halt all flow activity. |
Not sure whether to pause or archive? Pause for quick edits or temporary changes. Archive if you want to fully halt all flow activity.
Monitor and analyze
The automations dashboard shows four summary metrics at the top:
- Active - number of automations currently live and enabled
- Runs - total times your automations have been triggered
- Sent - total successful automation runs
- Issues - number of automations with at least one failed run
Managing and Monitoring Automations
The Automations dashboard displays all your email sequences in an organized view. You can filter by status, group automations, and view key performance metrics.Understanding Automation status indicators
Understanding Automation status indicators
Each Automation has a status indicator showing its current state:
- Draft (Gray): Automation is created but not yet activated
- Active (Green with pulsating dot): Automation is currently running
- Paused (Orange with pause icon): Automation is temporarily suspended
- Archived (Red with stop icon): Automation is fully halted and will not process any new triggers You can filter automations by status to focus on specific automation stages.
Creating Automation groups
Creating Automation groups
Organize your automations into logical categories for better management:
- Click “Add a new group” in the top left corner
- Provide a descriptive name (e.g., “Onboarding,” “Recovery,” or “Lifecycle”)
- Drag and drop automations into the appropriate groups
Performance metrics at a glance
Performance metrics at a glance
The dashboard shows four metrics across all automations:
- Active: Number of automations currently live and enabled
- Runs: Total automation trigger executions
- Sent: Total successful automation runs
- Issues: Number of automations with failed runs that need attention
Runs and issues
Runs and issues
Runs represent each time an automation is triggered and executes. The run count is shown per automation in the table and as a total in the summary bar.Issues are automations that have at least one failed run. A warning icon appears next to the automation name when this happens. Common causes include:
- Invalid or missing payload data in the trigger request
- Required fields not provided
- Email send failures (e.g., all recipients suppressed)
Filtering automations
Filtering automations
Use the filter dropdown to narrow the automations list:By status:
- Live - active and enabled
- Paused - temporarily suspended
- Draft - not yet activated
- Archived - fully halted
- Has runs - automations that have been triggered at least once
- Has issues - automations with at least one failed run
Pausing, Archiving, and Testing Automations
- Pausing: Temporarily suspend your automation. While paused, new triggers are not processed. When you resume, only new triggers going forward will be processed. Pausing is best for short-term edits or quick changes.
- Archiving: Fully halt your automation. No new triggers will be processed while archived. Use archiving when you want to completely halt all automation activity.
- Testing: Send a test preview from any email node to see what your contacts will receive.
Not sure whether to pause or archive? Pause for quick edits or temporary changes. Archive if you want to fully halt all automation activity.
Triggering Automations via API
Once your automation is published, trigger it from your backend by calling the/api/v1/automations/{automationId}/trigger endpoint with a payload:
Contact Upsert on Trigger
When you trigger an automation via API, Brew automatically:- Looks up the contact by the
emailfield in your payload - Creates a new contact if none exists, or updates the existing contact with payload data
- Returns the action taken in the response (
"action": "created"or"action": "updated")
firstName, custom fields) is automatically saved to the contact record.
The
email field is always required at the root level of your payload. Brew uses this to identify the contact.Common Use Cases
Below are real-world examples showing how to integrate automation triggers into your application. For complete SDK documentation with error handling and advanced patterns, see the TypeScript SDK or Python SDK.- Welcome Email
- Order Confirmation
- Payment Failed
- Trial Ending
Trigger a welcome sequence when a user creates an account:
Trigger Best Practices
Use descriptive event IDs
Use descriptive event IDs
Choose clear, specific event IDs that describe the action:Good:
order_placed, user_signup, subscription_renewedAvoid: event1, trigger, actionKeep payloads flat and minimal
Keep payloads flat and minimal
Avoid nested objects in your payload when possible:Good (flat):Avoid (nested):Flat payloads are easier to map to contact fields and use in email templates.
Handle API errors gracefully
Handle API errors gracefully
Implement error handling for common scenarios:
400 INVALID_PAYLOAD- Fix payload data and retry400 AUTOMATION_NOT_ACTIVE- Check automation status in Brew401 UNAUTHORIZED- Verify API key404 AUTOMATION_NOT_FOUND- Check automation ID
Use idempotency for critical triggers
Use idempotency for critical triggers
For important automations (like order confirmations), include an idempotency key:This prevents duplicate emails if your request is retried.
Customer Journey Automation Templates
| Use Case | Event ID Example | Payload Fields | Flow Contents |
|---|---|---|---|
| Onboarding | user_signup | email, firstName, plan | 1–5 welcome/onboarding emails over 30 days |
| Order Confirmation | order_placed | email, firstName, orderId, orderTotal, items | Order confirmation + shipping updates |
| Payment Issue | payment_failed | email, firstName, amount, retryUrl | 1–3 emails to resolve payment issue |
| Subscription | subscription_started | email, firstName, plan, billingCycle | Welcome to premium + feature highlights |
| Win-Back | churn_detected | email, firstName, lastActive, reason | 1 feedback email, then win-back offers |
Frequently Asked Questions
How do I trigger an automation from my backend?
How do I trigger an automation from my backend?
Use the Brew API to trigger automations. Send a POST request to
/api/v1/automations/{automationId}/trigger with your payload:How do I define the payload schema?
How do I define the payload schema?
In the trigger configuration, you can define the expected payload structure. Add fields with their types (string, number, boolean, object, array) and mark which fields are required. This schema is used to validate incoming API requests.
How do I use payload data in my emails?
How do I use payload data in my emails?
Access payload data using the
@trigger:output.payload prefix. For example, if your payload includes firstName, use {{@trigger:output.payload.firstName}} in your email template to personalize the message.What happens if payload validation fails?
What happens if payload validation fails?
If the payload doesn’t match your schema (missing required fields or wrong types), the API returns a 400 error with details about which fields failed validation:The automation does not execute until a valid payload is provided.
Need Help?
Our team is ready to support you at every step of your journey with Brew. Choose the option that works best for you:- Self-Service Tools
- Talk to Our Team
Search Documentation
Type in the “Ask any question” search bar at the top left to instantly find relevant documentation pages.
ChatGPT/Claude Integration
Click “Open in ChatGPT” at the top right of any page to analyze documentation with ChatGPT or Claude for deeper insights.