Setting up DNS records is essential to make sure your emails reach inboxes, are trusted by recipients, and stay out of spam. By adding these records, you’re essentially granting Brew permission to send emails on your behalf while proving to email providers that you’ve authorized these messages. This guide will walk you through exactly what to do.
If you see a red warning sign next to “DNS Records” in settings, you should follow this guide.
What is DNS Records?
What is DNS Records?
Introduction to DNS Records
DNS (Domain Name System) is like the internet’s address book. It helps route your emails and website traffic to the right place, making sure your messages get delivered and your brand is trusted.Every device connected to the Internet has a unique IP address. DNS translates easy-to-remember domain names (like brew.new) into these numeric IP addresses so computers can find each other.DNS is also essential for email security. Records like SPF, DKIM, and DMARC prove your emails are really from you, protecting your brand and your recipients from spam and phishing.What are MX Records?
Routes your emails to the right destination. MX (Mail Exchange) records direct emails sent to your domain to the proper mail servers. For sending emails with Brew, these records also allow you to receive important delivery feedback like bounces and complaints.What are SPF & DMARC Records?
Protects your domain from unauthorized use. SPF (Sender Policy Framework) is an email authentication standard that lists all servers authorized to send email on behalf of your domain. It’s set up as a TXT record in your DNS that essentially says “these servers (including Brew) are allowed to send emails from my domain. Since Brew’s SPF records are at courier.yourdomain.com, they won’t collide with any other SPF records you have set up.”What are DKIM CNAME Records?
Verifies your emails are genuinely from you. DKIM (DomainKeys Identified Mail) adds a digital signature to your emails that proves they haven’t been tampered with in transit. This signature confirms the email is actually from you and hasn’t been modified by anyone else.Brew handles all the technical details of these records for you - you just need to add them to your domain settings.
The Three DNS Records You Need
To send emails with Brew, you’ll need to add three types of DNS records to your domain registrar. Each one plays a key role in making sure your emails are delivered and trusted.MX Records
Routes your emails to the right destination
SPF & DMARC Records
Protects your domain from unauthorized use
DKIM CNAME Records
Verifies your emails are genuinely from you
Before you add DNS records, make sure you’ve set your sending domain. This is the first step.
How to Add DNS Records
You configure DNS records from your account settings after completing the initial setup. Navigate to Settings → DNS Records in the left navigation menu to access the DNS configuration page.- Manual Setup
- One-Click Setup (Coming Soon)
Select Manual Setup
Click 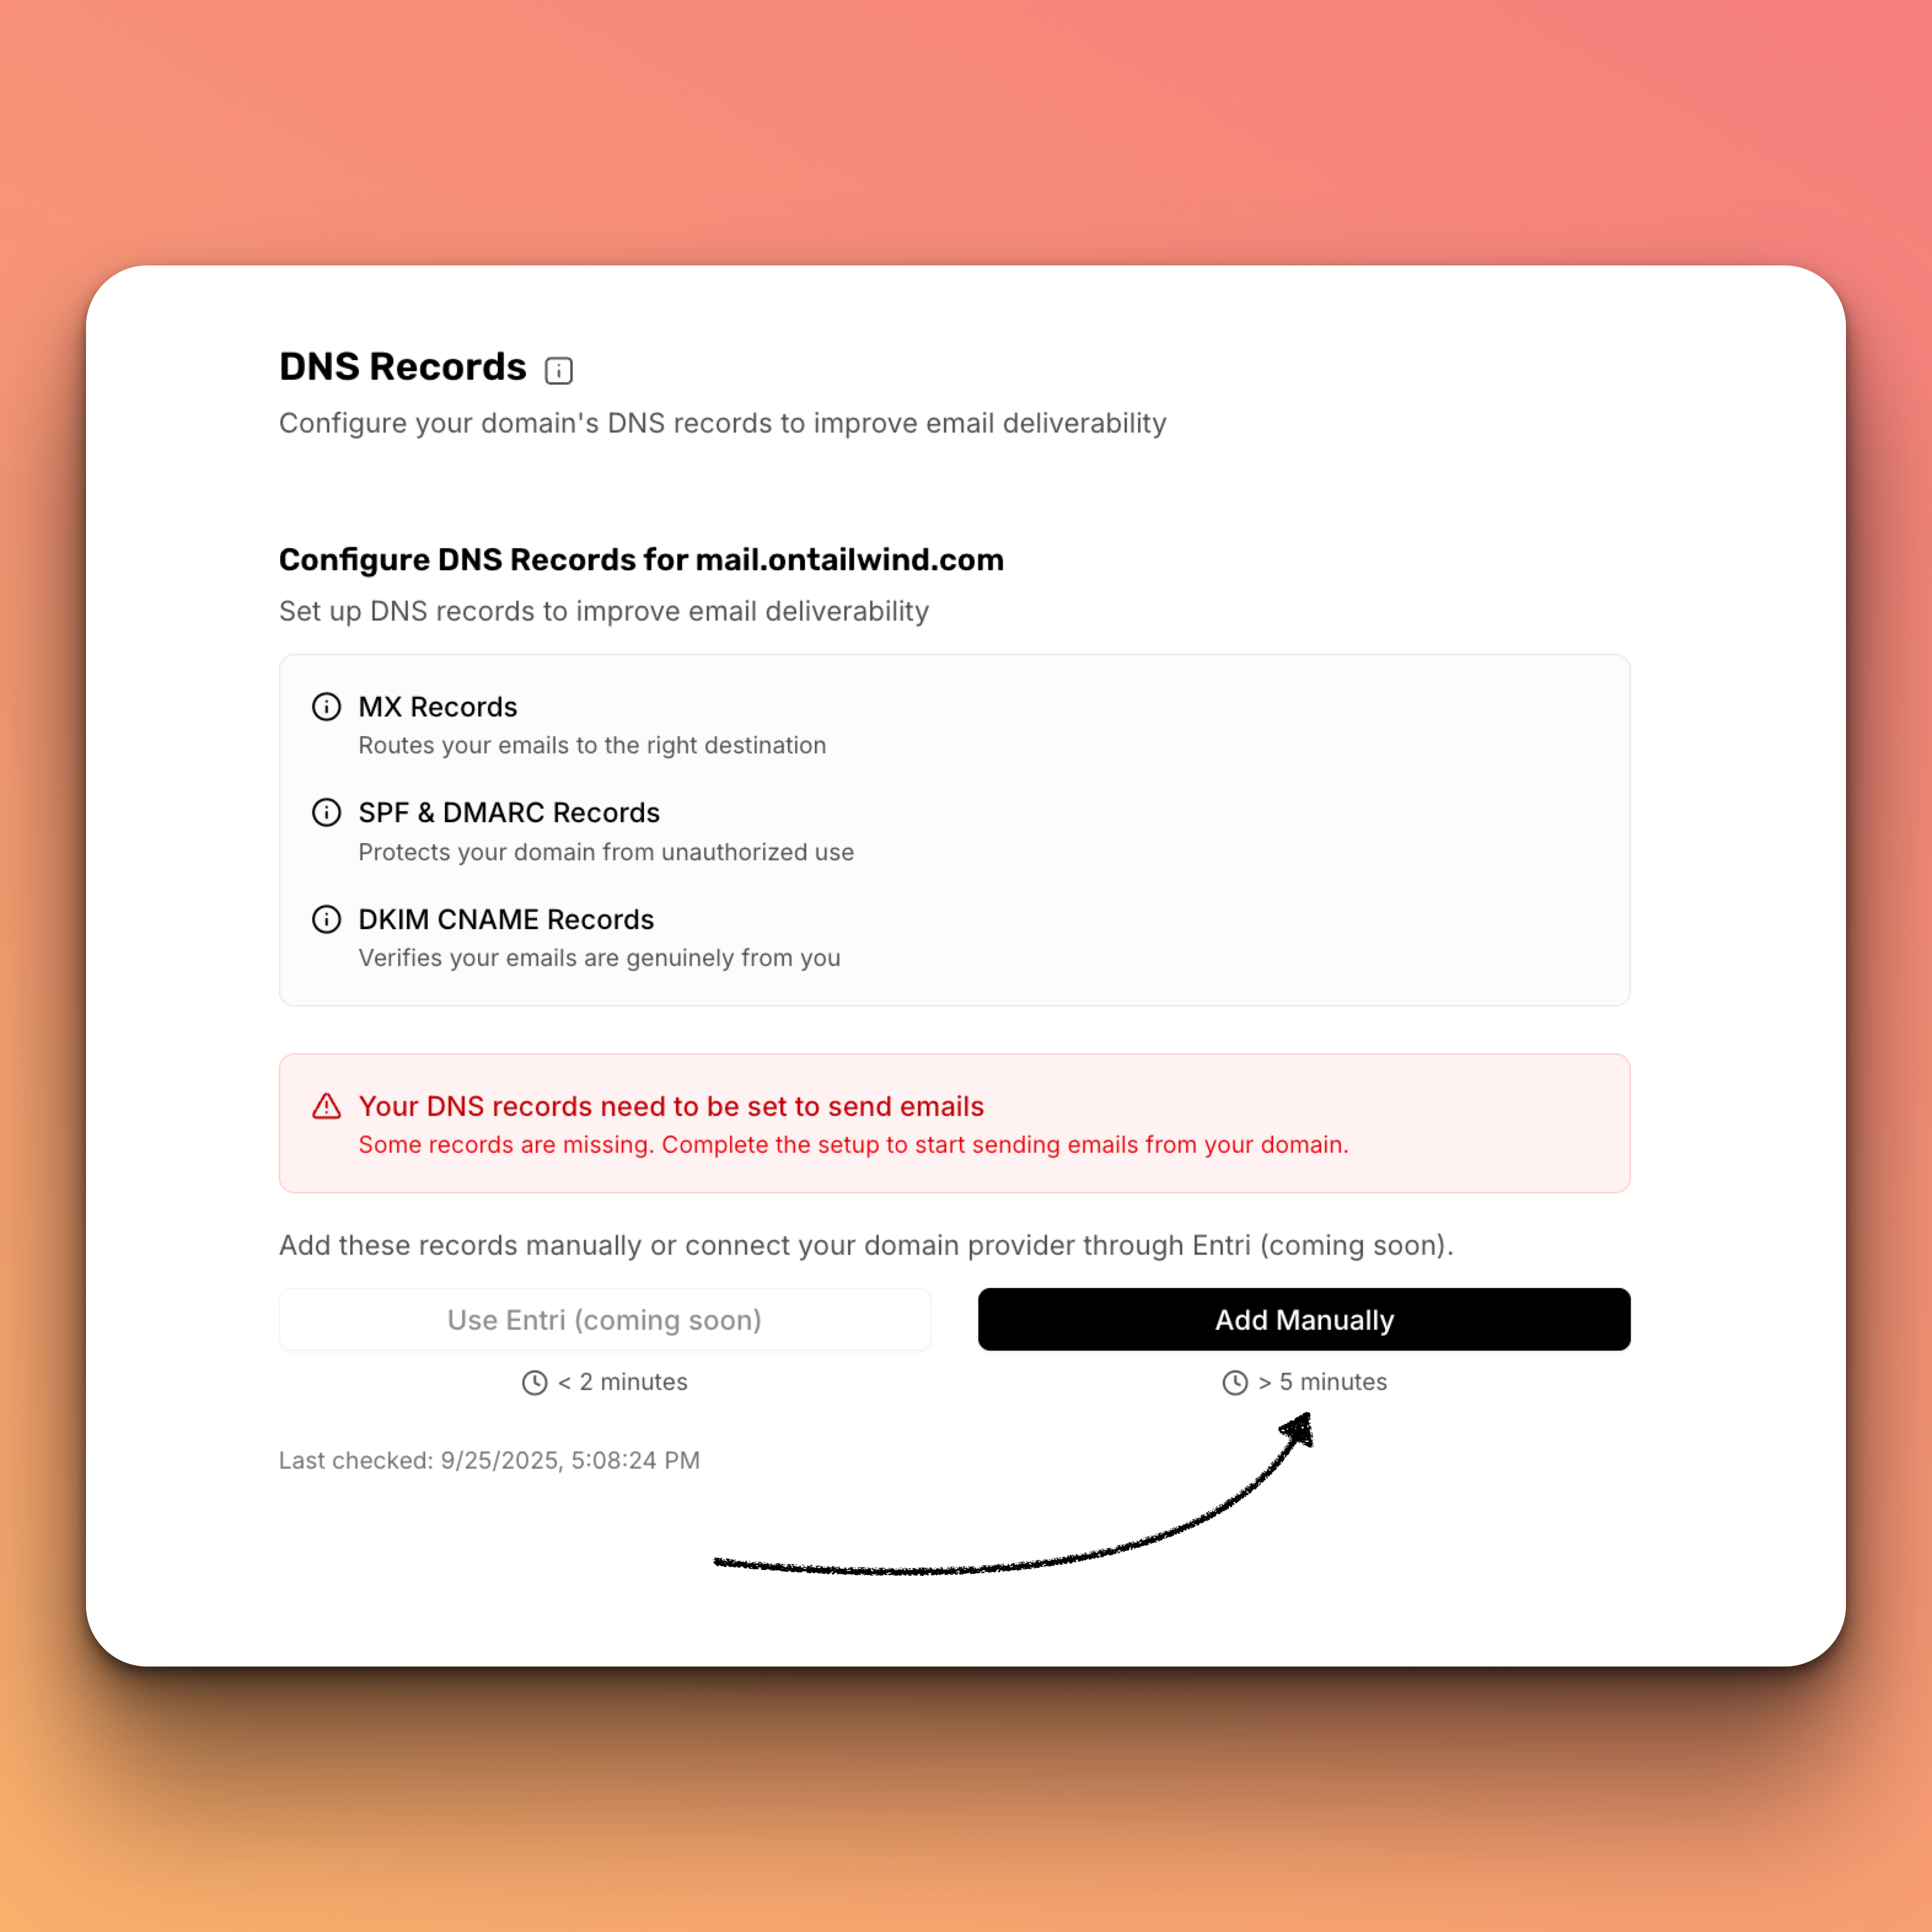
Add manually to configure your DNS records by copying and pasting them into your domain provider’s dashboard.View your required records
In the DNS Records section, you’ll see a list of the records you need to add to your domain.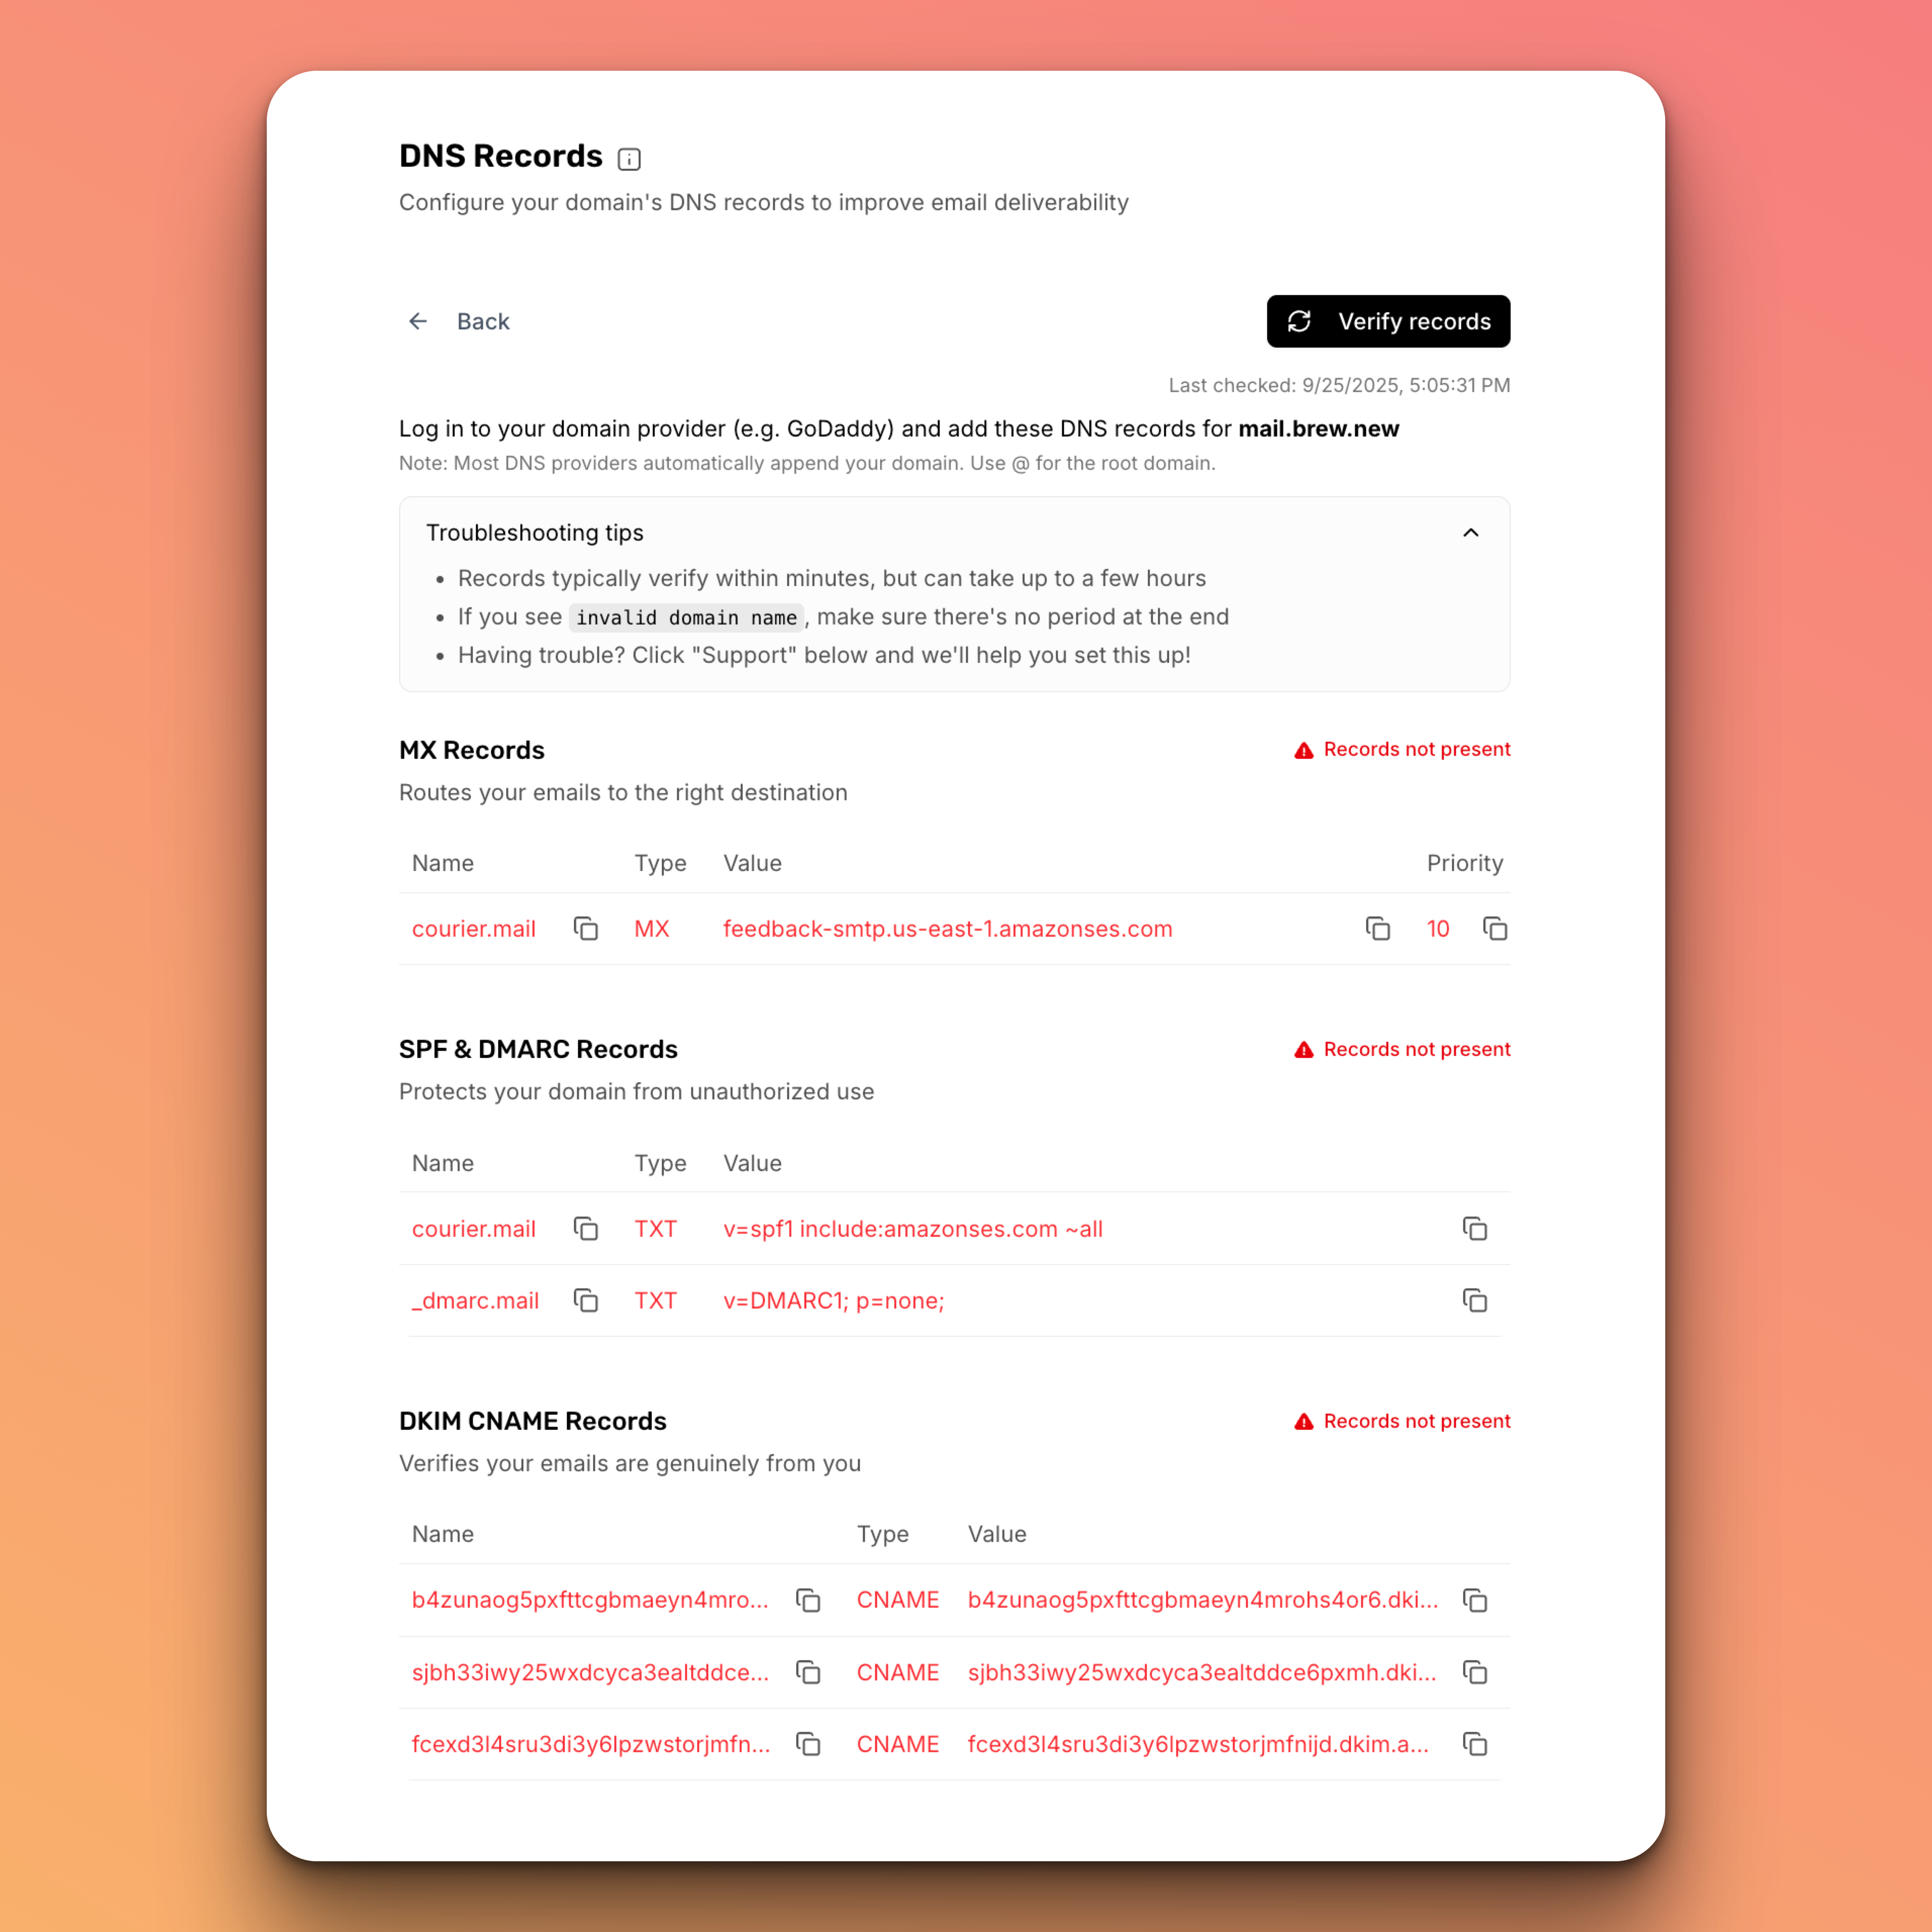
Add DNS Records at Your Registrar
Follow these steps at your domain registrar for each record listed in your Brew dashboard:
Not sure how to add DNS records? Expand your provider below for step-by-step instructions and Brew-specific tips.
- Log in to your registrar account
- Look for options like “Add Record,” “Create Record,” or similar
- Select the appropriate record type (MX, TXT, or CNAME) shown in the “Type” column
- For the Host or Name field, paste the value shown in the “Name” column
- For the Value field, paste the text copied from the “Value” column
- If asked for TTL (Time To Live), enter 3600 or select 1 hour
- For MX records only, enter 10 in the “Priority” field if your registrar requests it
Don't have access to your domain registrar?
Don't have access to your domain registrar?
If you don’t have direct access to your domain registrar:
- Add technical team members to your Brew account who can handle the DNS setup
- Share this guide with your IT team or domain administrator
- They’ll have all the instructions needed to add the required DNS records for you
Handling MX Record Conflicts
Handling MX Record Conflicts
If you already have an MX record set for the same hostname (e.g., mail.yourdomain.com), you will need to remove it before adding Brew’s MX record to avoid conflicts.Important: The MX record is for your sending subdomain (e.g., mail.yourdomain.com), not your root domain. MX records only impact the specific subdomain they are associated with, so Brew’s MX record will not affect any existing email setup on your root domain.If you need to keep your existing MX record, you can:
- Use a different subdomain for Brew (e.g., mail.yourdomain.com or newsletter.yourdomain.com)
- Return to Settings → Domain in Brew to update your sending domain
- Follow this guide again with your new subdomain
GoDaddy
GoDaddy
- Log in to GoDaddy and open your domain’s DNS settings.
- Click Add to create a new record.
- For each record in your Brew dashboard:
- Type: Select MX, TXT, or CNAME as shown.
- Host: Use the subdomain (e.g.,
mail). - Value: Paste the value from Brew.
- Priority: For MX, set to 10.
- If you see an “invalid hostname” error, try adding a period (.) at the end of the Points to value.
Cloudflare
Cloudflare
- Log in to Cloudflare and select your domain
- Go to the DNS tab
- Click Add record for each Brew record
- Set Proxy status to “DNS Only” (gray cloud) for all MX, TXT, and CNAME records
- Proxying these records will break email authentication
Google Domains
Google Domains
- Log in to Google Domains and select your domain
- Go to the DNS section and use the Custom resource records area
- For MX records, enter the priority and mail server in one field
- Google may add quotes to TXT records—this is normal and will not impact anything
Namecheap
Namecheap
- Log in to Namecheap and go to Advanced DNS for your domain
- If you use Gmail or G Suite, disable the automatic integration and switch Mail Settings to Custom MX in the Mail Settings dropdown before adding Brew’s MX records
- After switching, you will need to add an MX record to set up Gmail on your domain again
- The Priority field for MX is unlabeled—it’s the empty column after Value
- Click the checkmark to save each record
- Remove any old or conflicting MX records to avoid delivery issues
AWS Route 53
AWS Route 53
- Log in to AWS Route 53 and open Route 53
- Select your hosted zone and click Create record for each DNS entry
- For MX records, put the priority and value together
- Only enter the subdomain part for record names
Squarespace
Squarespace
- Log in to Squarespace, go to Domains, pick your domain, and scroll to Custom Records
- Add MX, TXT, and CNAME records as shown in Brew
- Remove any trailing periods if you see errors
- If you use Squarespace Email or G Suite, adding new MX records may interfere—use a separate subdomain if possible
Vercel
Vercel
- Log in to Vercel and open your domain’s DNS settings.
- Add each record from Brew.
- Use only the subdomain part for record names.
- If you already have an MX record with priority 10, pick a different number.
Wix
Wix
- Wix DNS doesn’t support MX records for subdomains if your nameservers are pointed at Wix
- If you purchased a domain outside of Wix, use the “Pointing” method to manage DNS externally, then add records using this guide: Managing DNS Records in Your Wix Account
- To use a subdomain, manage DNS externally (like Cloudflare or GoDaddy)
- If you must use Wix DNS, you can only add MX records to the root domain (not recommended)
Dreamhost
Dreamhost
- Dreamhost is currently unsupported for custom MX records—you cannot add custom MX records for subdomains
- Use an external DNS provider for full control, or contact Dreamhost support to see if they can add records for you
Verify your records
Return to Brew and click the “Verify Records” button at the bottom of the page. Brew will check if your records have been properly configured.
- Not Verified
- Partially Verified
- Fully Verified
Before you add the DNS records, all indicators will be red, showing that records haven’t been verified yet.
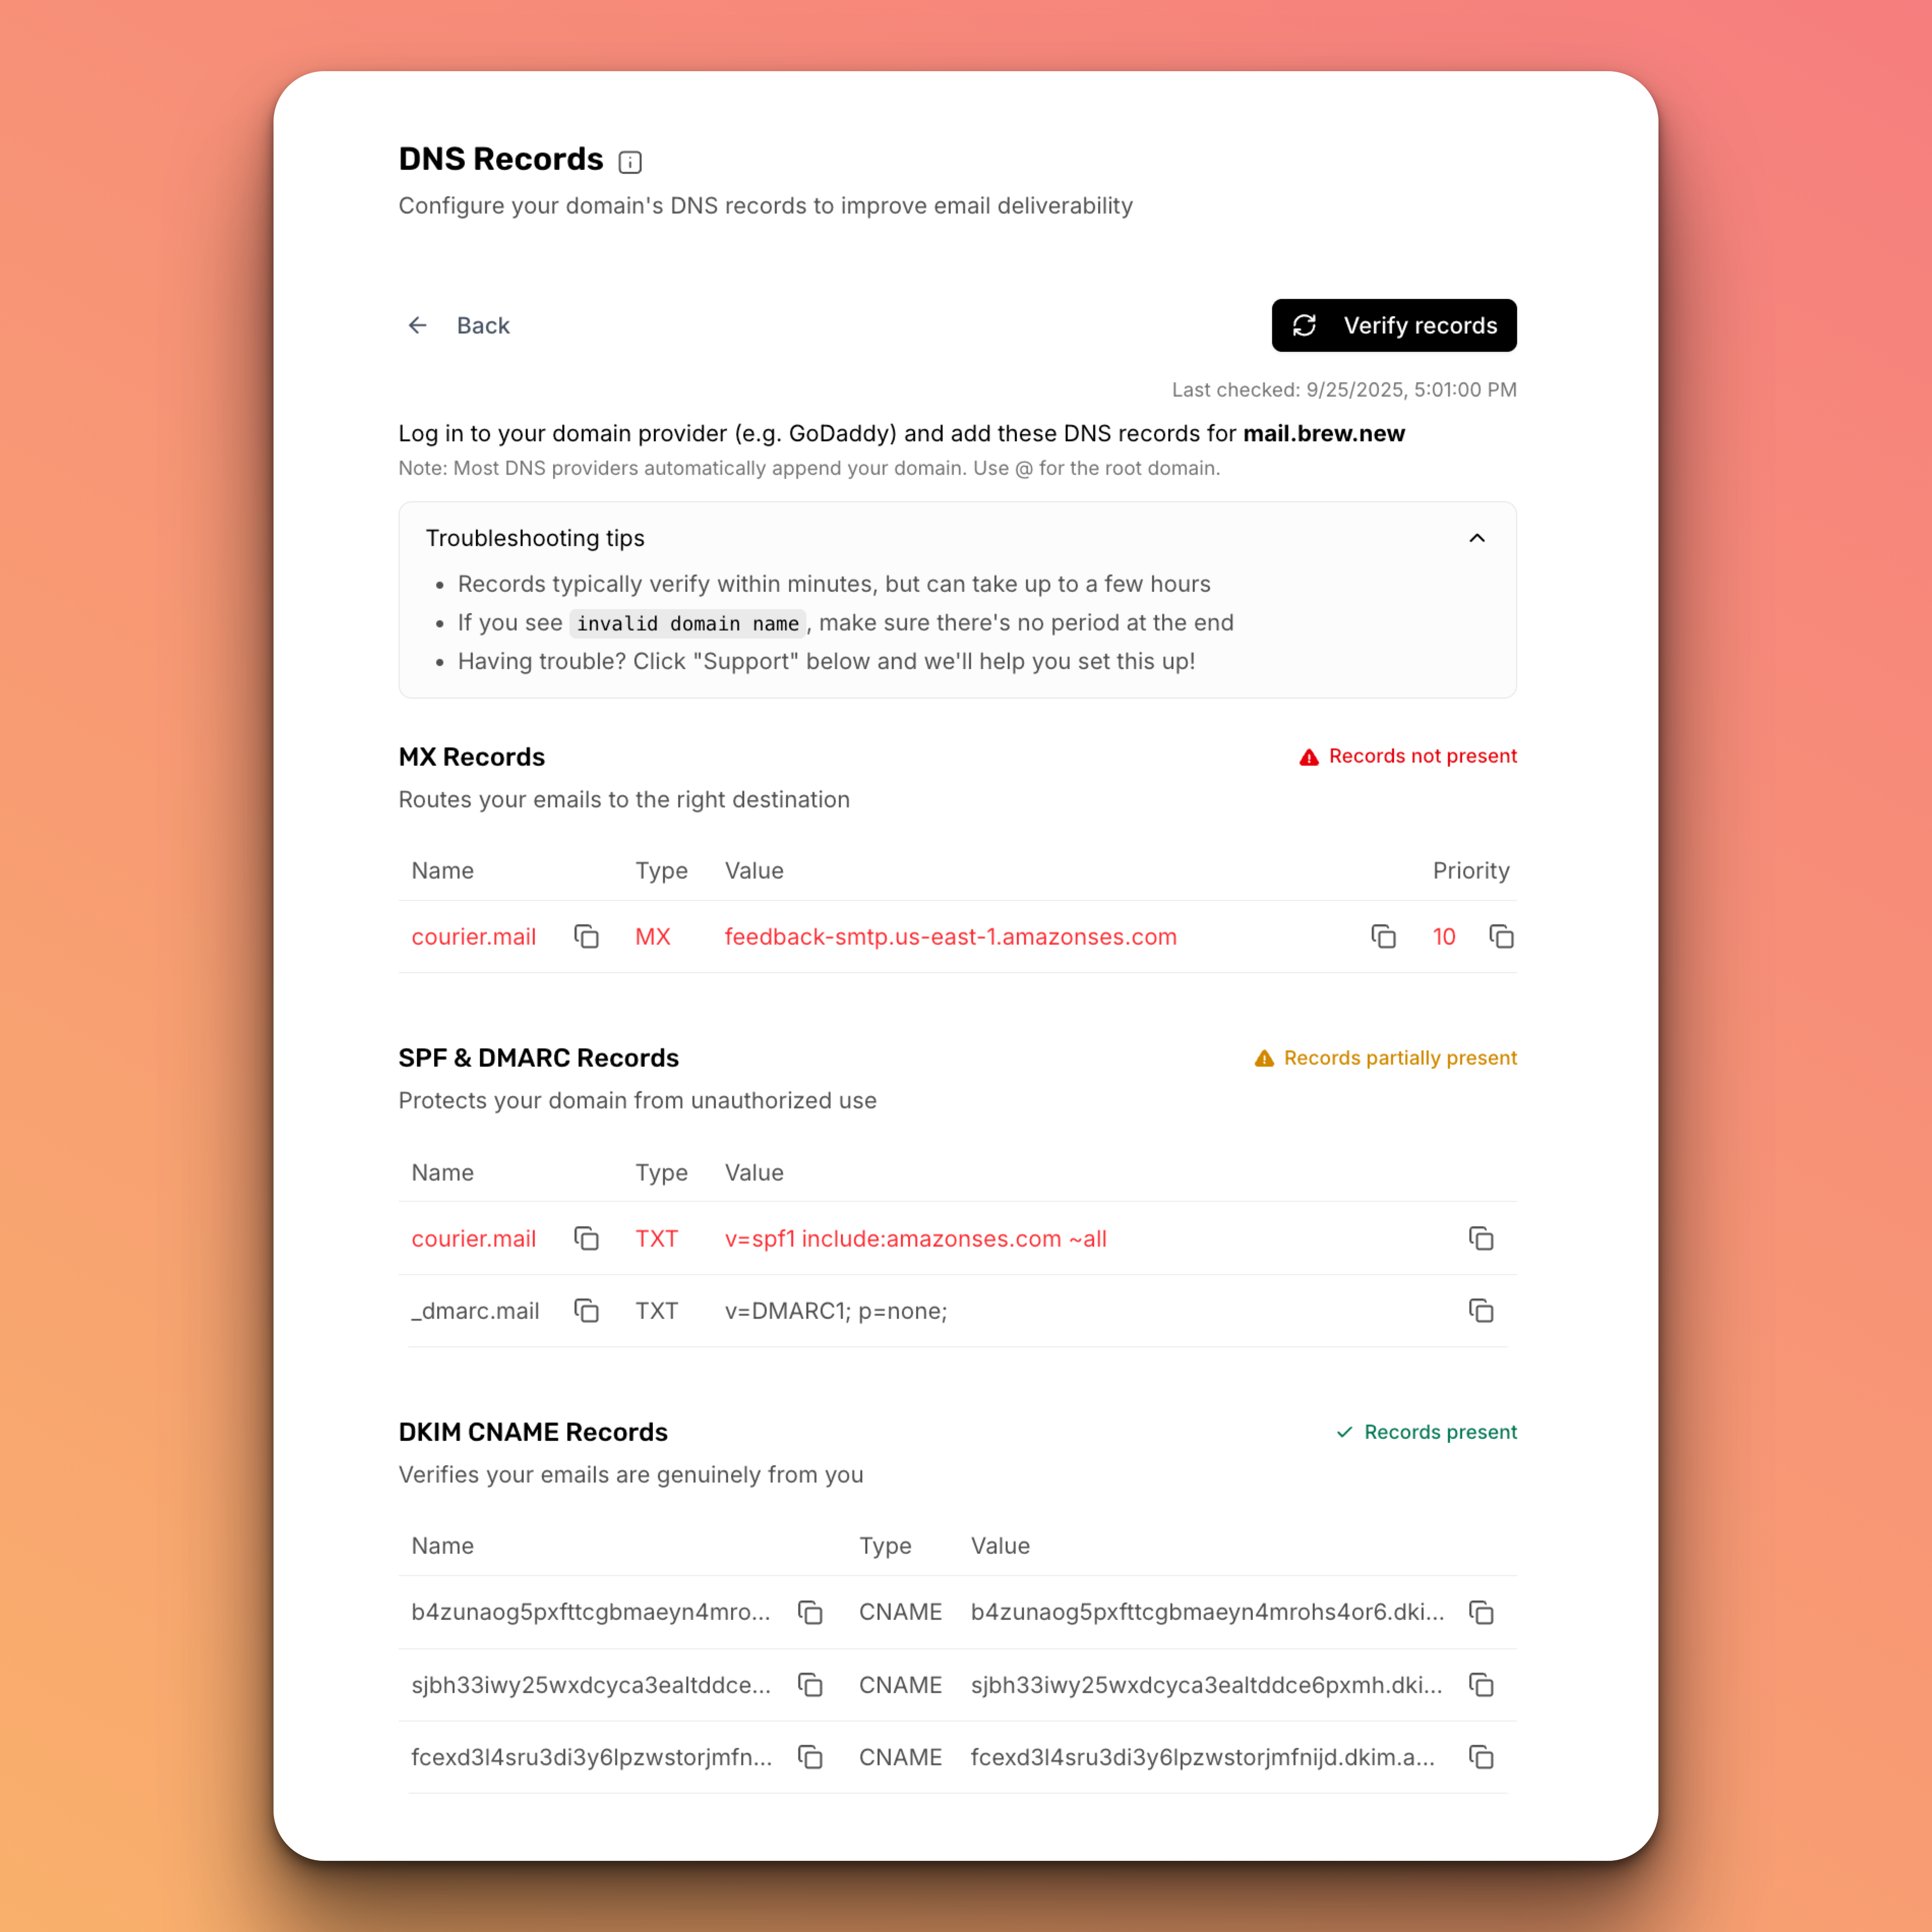
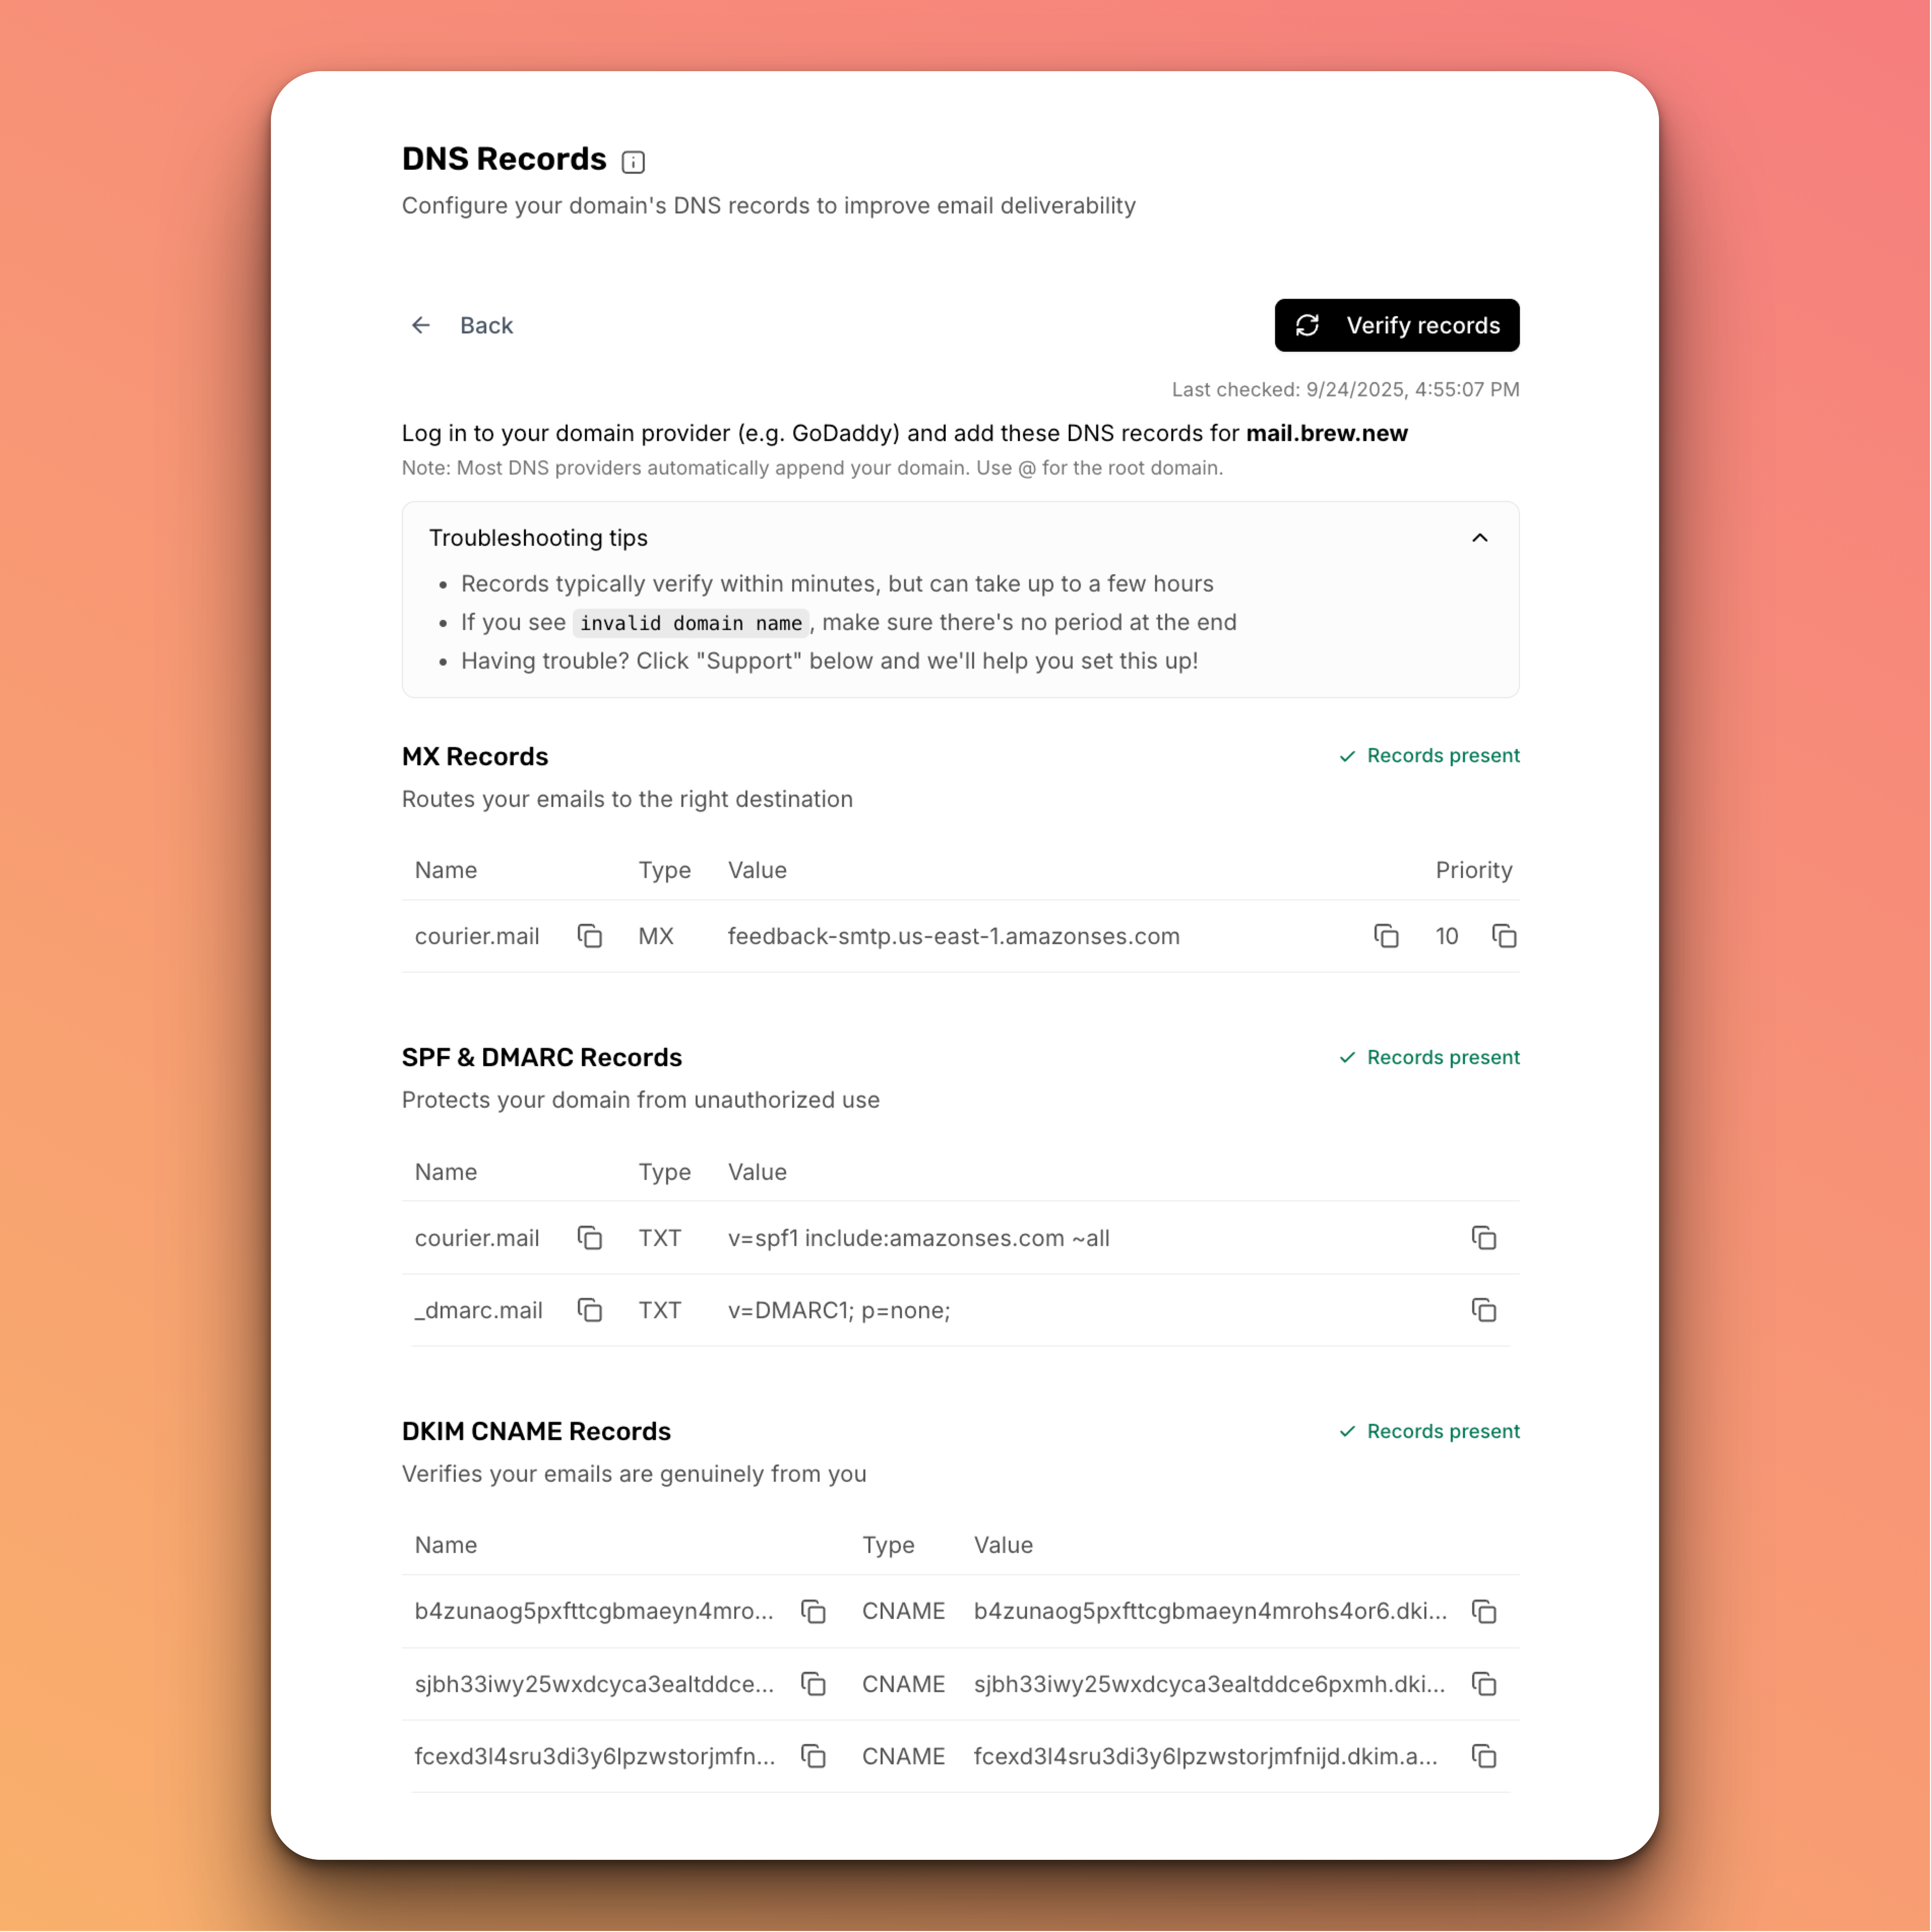
Records typically verify within minutes, but can take up to a few hours to propagate across all servers. During that time, you may see different records validate. This is normal - just check back later.
Quick Tips
Be patient
DNS changes can take up to a few hours (sometimes longer) to fully propagate. If verification fails initially, wait and try again before troubleshooting.
Copy values exactly
Use the clipboard icons to copy and paste values directly from the Brew dashboard to avoid typos. Always copy DKIM values exactly—no extra spaces or quotes.
When you’ll need to repeat DNS setup
You’ll need to add new DNS records and verify them again if you: Change your domain setup:- Switch to a different subdomain (
mail.company.com→news.company.com) - Change your root domain (
company.com→newcompany.com)
- Switch DNS providers or transfer your domain to a different registrar (GoDaddy → Cloudflare, Namecheap → AWS Route 53, etc.)
- Change your domain’s nameservers
mail.company.com to news.company.com, you’ll update your domain in Settings → Domain and then complete this entire DNS verification process for the new domain.
If any of these changes occur, return to this guide and follow the same steps with your new domain or DNS provider. We also recommend completing the domain warm-up process again to ensure optimal deliverability.
Need Help?
Our team is ready to support you at every step of your journey with Brew. Choose the option that works best for you:- Self-Service Tools
- Talk to Our Team
Search Documentation
Type in the “Ask any question” search bar at the top left to instantly find relevant documentation pages.
ChatGPT/Claude Integration
Click “Open in ChatGPT” at the top right of any page to analyze documentation with ChatGPT or Claude for deeper insights.